
The one about Composition and that dreaded Perspective thing.
When we look at things around us, we don’t see them in a sequence, pattern or repetition. Our surrounding is full of visual noise, and it can be very complex and busy, and when we want to draw this, it can get overwhelming really fast. So here’s hopefully some help to get you started with How to know what, and where to focus your attention on.
I’d like to think of drawing in terms of Space, Subjects and Light. So when we’re thinking and deciding what to draw, I ask myself what I want it to be? pleasant, interesting, attractive? Or maybe intense, dramatic, sensorial?
Let’s say there’s a corner of a cafe I am sitting in that I’ve got my eye on to sit and sketch it, in that moment, I would ask ‘what do I want this sketch to be? I want it to be colourful, invigorating, fresh = pleasant.
Or I want it to convey the intensity of the afternoon sun is hitting it so beautifully, I want that to be in the sketch = sensorial, nostalgic.
So thats where my focus of composition will be from.

Both are correct, but the rule of thirds composition is slightly more pleasing

Why is composition important?
Composition needs to help the image tell the story you want to tell. Because we’re drawing what we see that is 3D, into our 2D paper. The illusion of depth, and spatial design becomes the key to this exercise. Composition is both easy, and can also be tricky.
Composition is not something to learn technically unless you’re doing a serious graphic design or interior design course. Most of us understand the basics of composition from basic photography lessons as to how to frame our subjects/objects.
Basic composition structure that is Easy on The Eye is always related to the symmetry and flow. And while there are literally hundreds of ways we can compose our drawing, there are only a few that keeps being used and referenced by artists.
One of them is the use of rule of thirds/ the golden triangle/the golden rule. If you divide the space into equal thirds horizontally and vertically, the points in which they intersect is where you’d want to put your subject/object/focal point. This is the location where our eyes will want to go first, and this applies to all frames, whether your layout is portrait or landscape, or square.
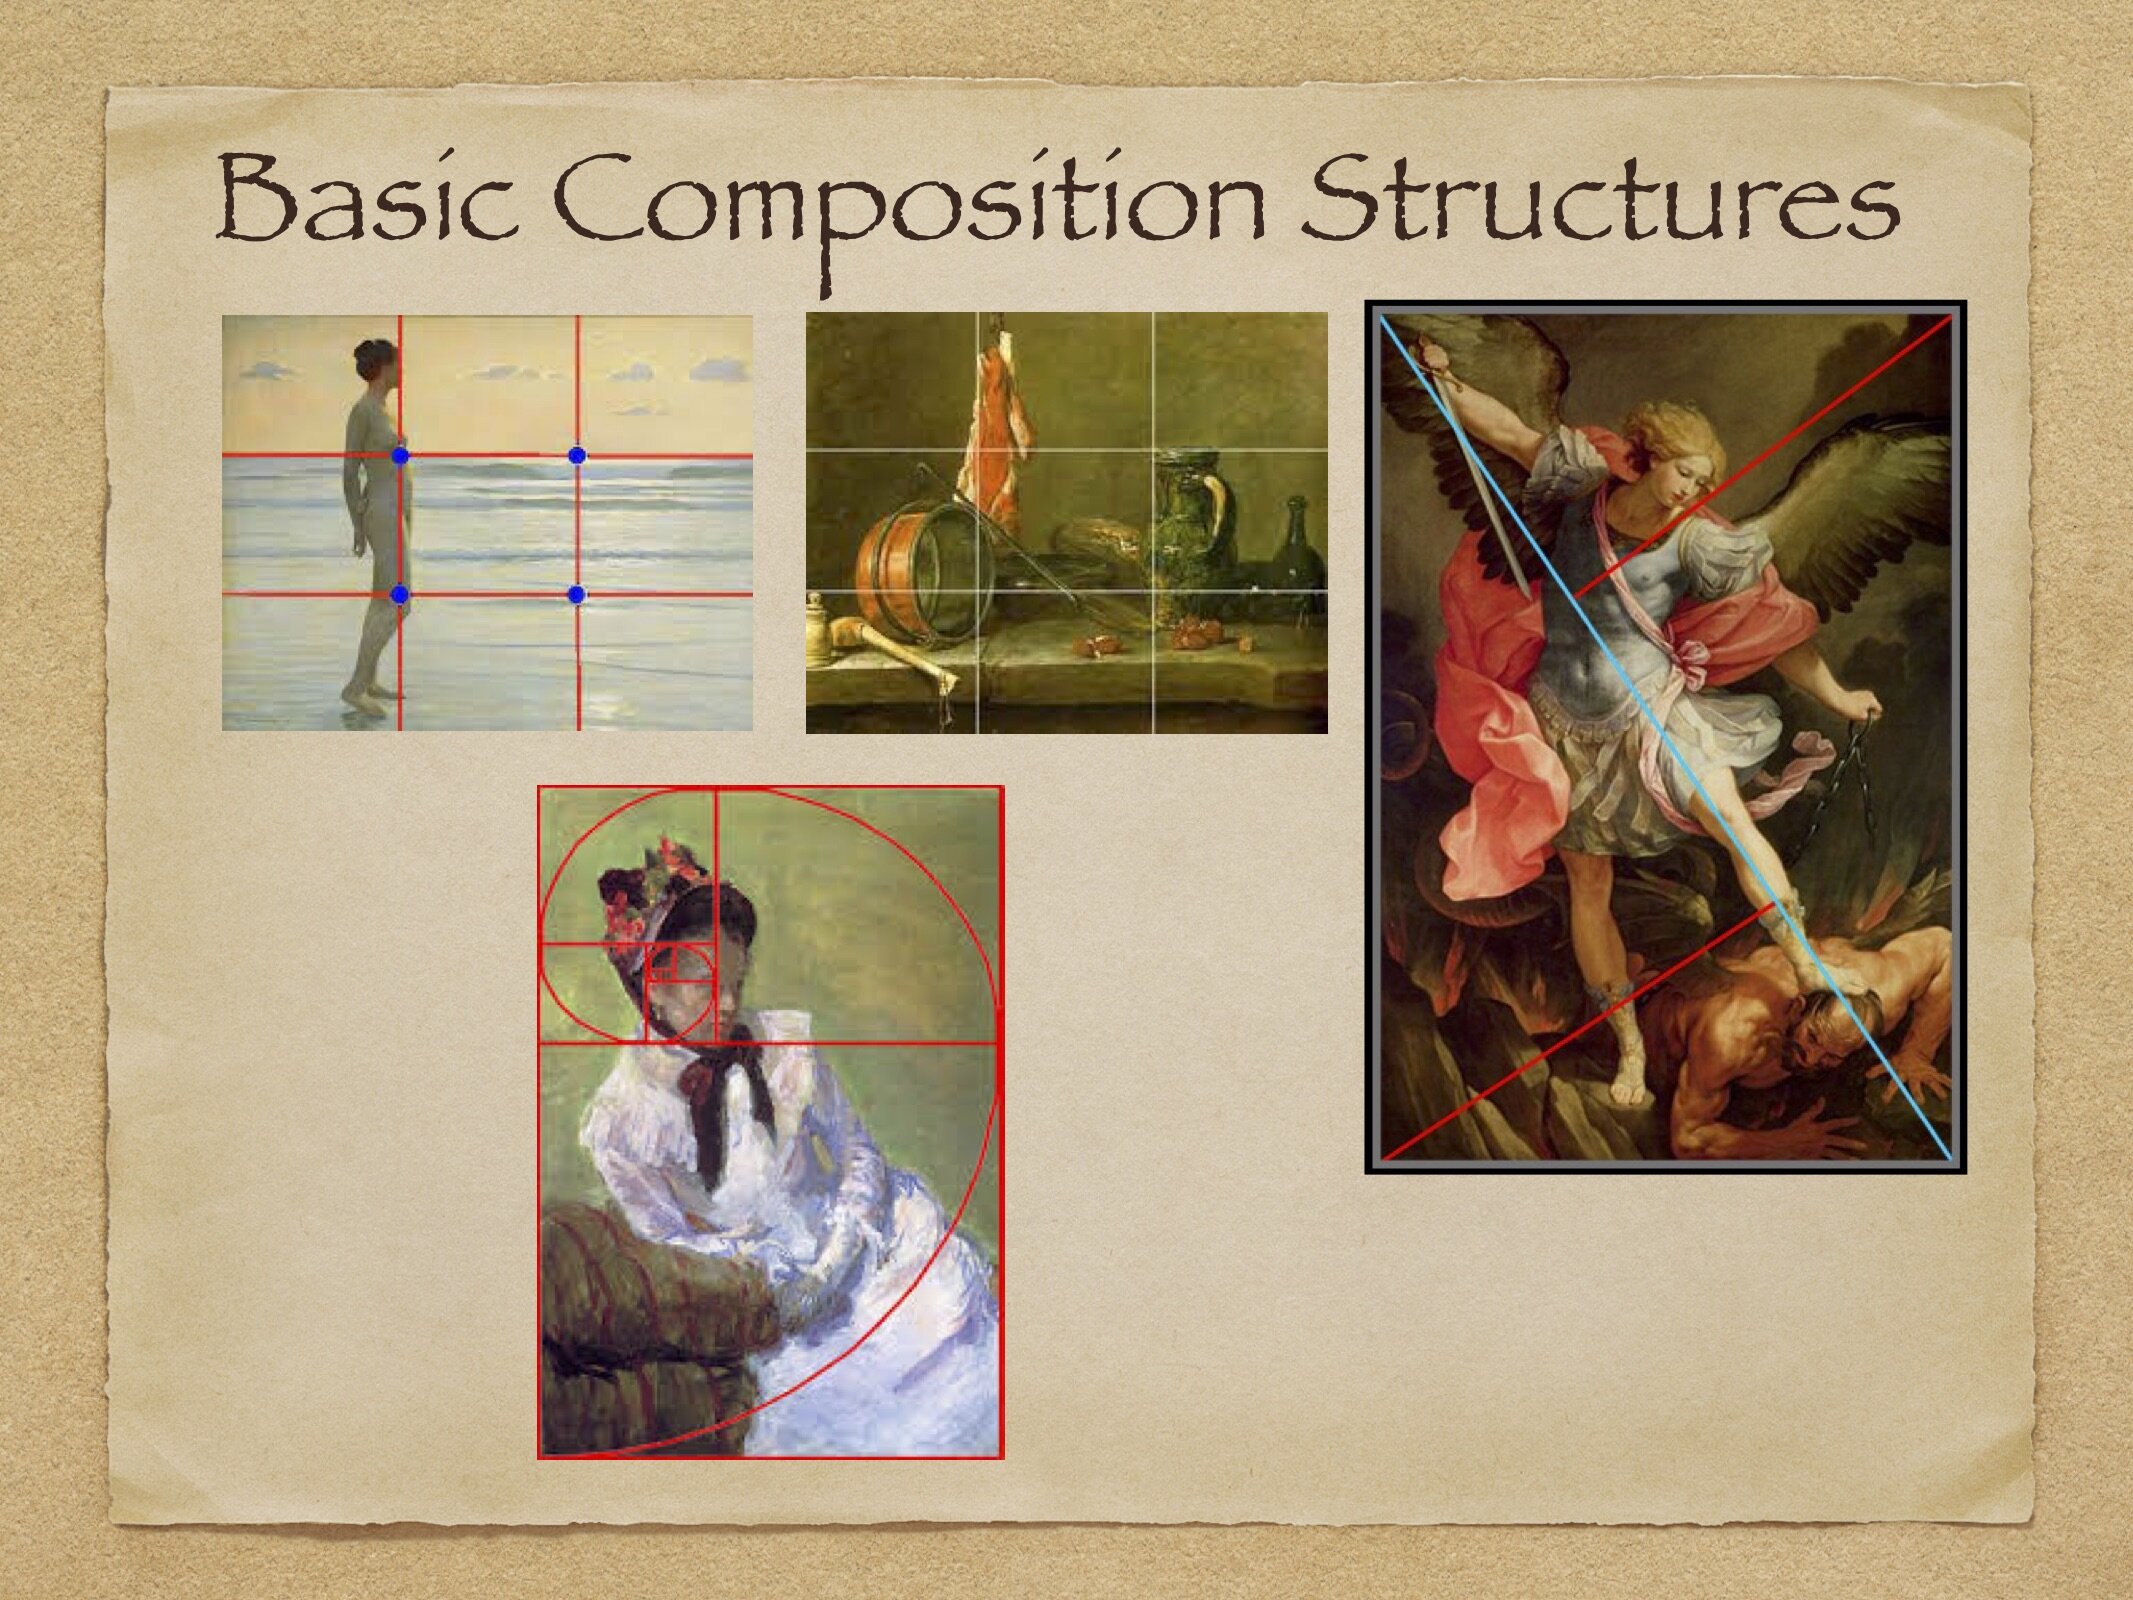
The popular composition structure
The next thing to consider is proportion. How big or small things are, what orientation. And this is where the concept of perspective kicks in. When a composition is bad, you can see it, you can feel it, you know something isn’t quite right, and sometimes the fix is easier than you think. Here are a few thoughts to try out when playing with composition.
Does the size has a balanced proportion.
Does the tilt has a believable angle
The overlap of subject should be significant. Subjects that are kissing edges or floating in space is almost always awkward. And that’s not a tension you want.
Is there an asymmetrical balance in the overall picture. And this also includes tension.
Tension is when your composition is interesting, because it has something odd in it, that works, an imbalance that is in effect balanced. The oddness is good because it magnify our sense of reality.
Perspective gives our 2D drawing a sense of reality. And this is why we learn to draw it. Using your pencil as the angle measuring tool, you can use it like the dial on the face of a clock. When measuring angles with this method, don’t tilt the pencil forward or backwards, it can only turn left or right at 360 degrees as if they’re the dial in a clock.
When measuring angles that are foreshortened. Most things converging into the distance will diminish in size, and the length of that distance looks shorter than it actually is. This clock dial angle is very useful, because it lets you see what angle a line becomes when it converge into the vanishing point, and trust the measurement. Yes that oddly short angle is the correct angle, even if you find your brain protesting that it can’t be right.

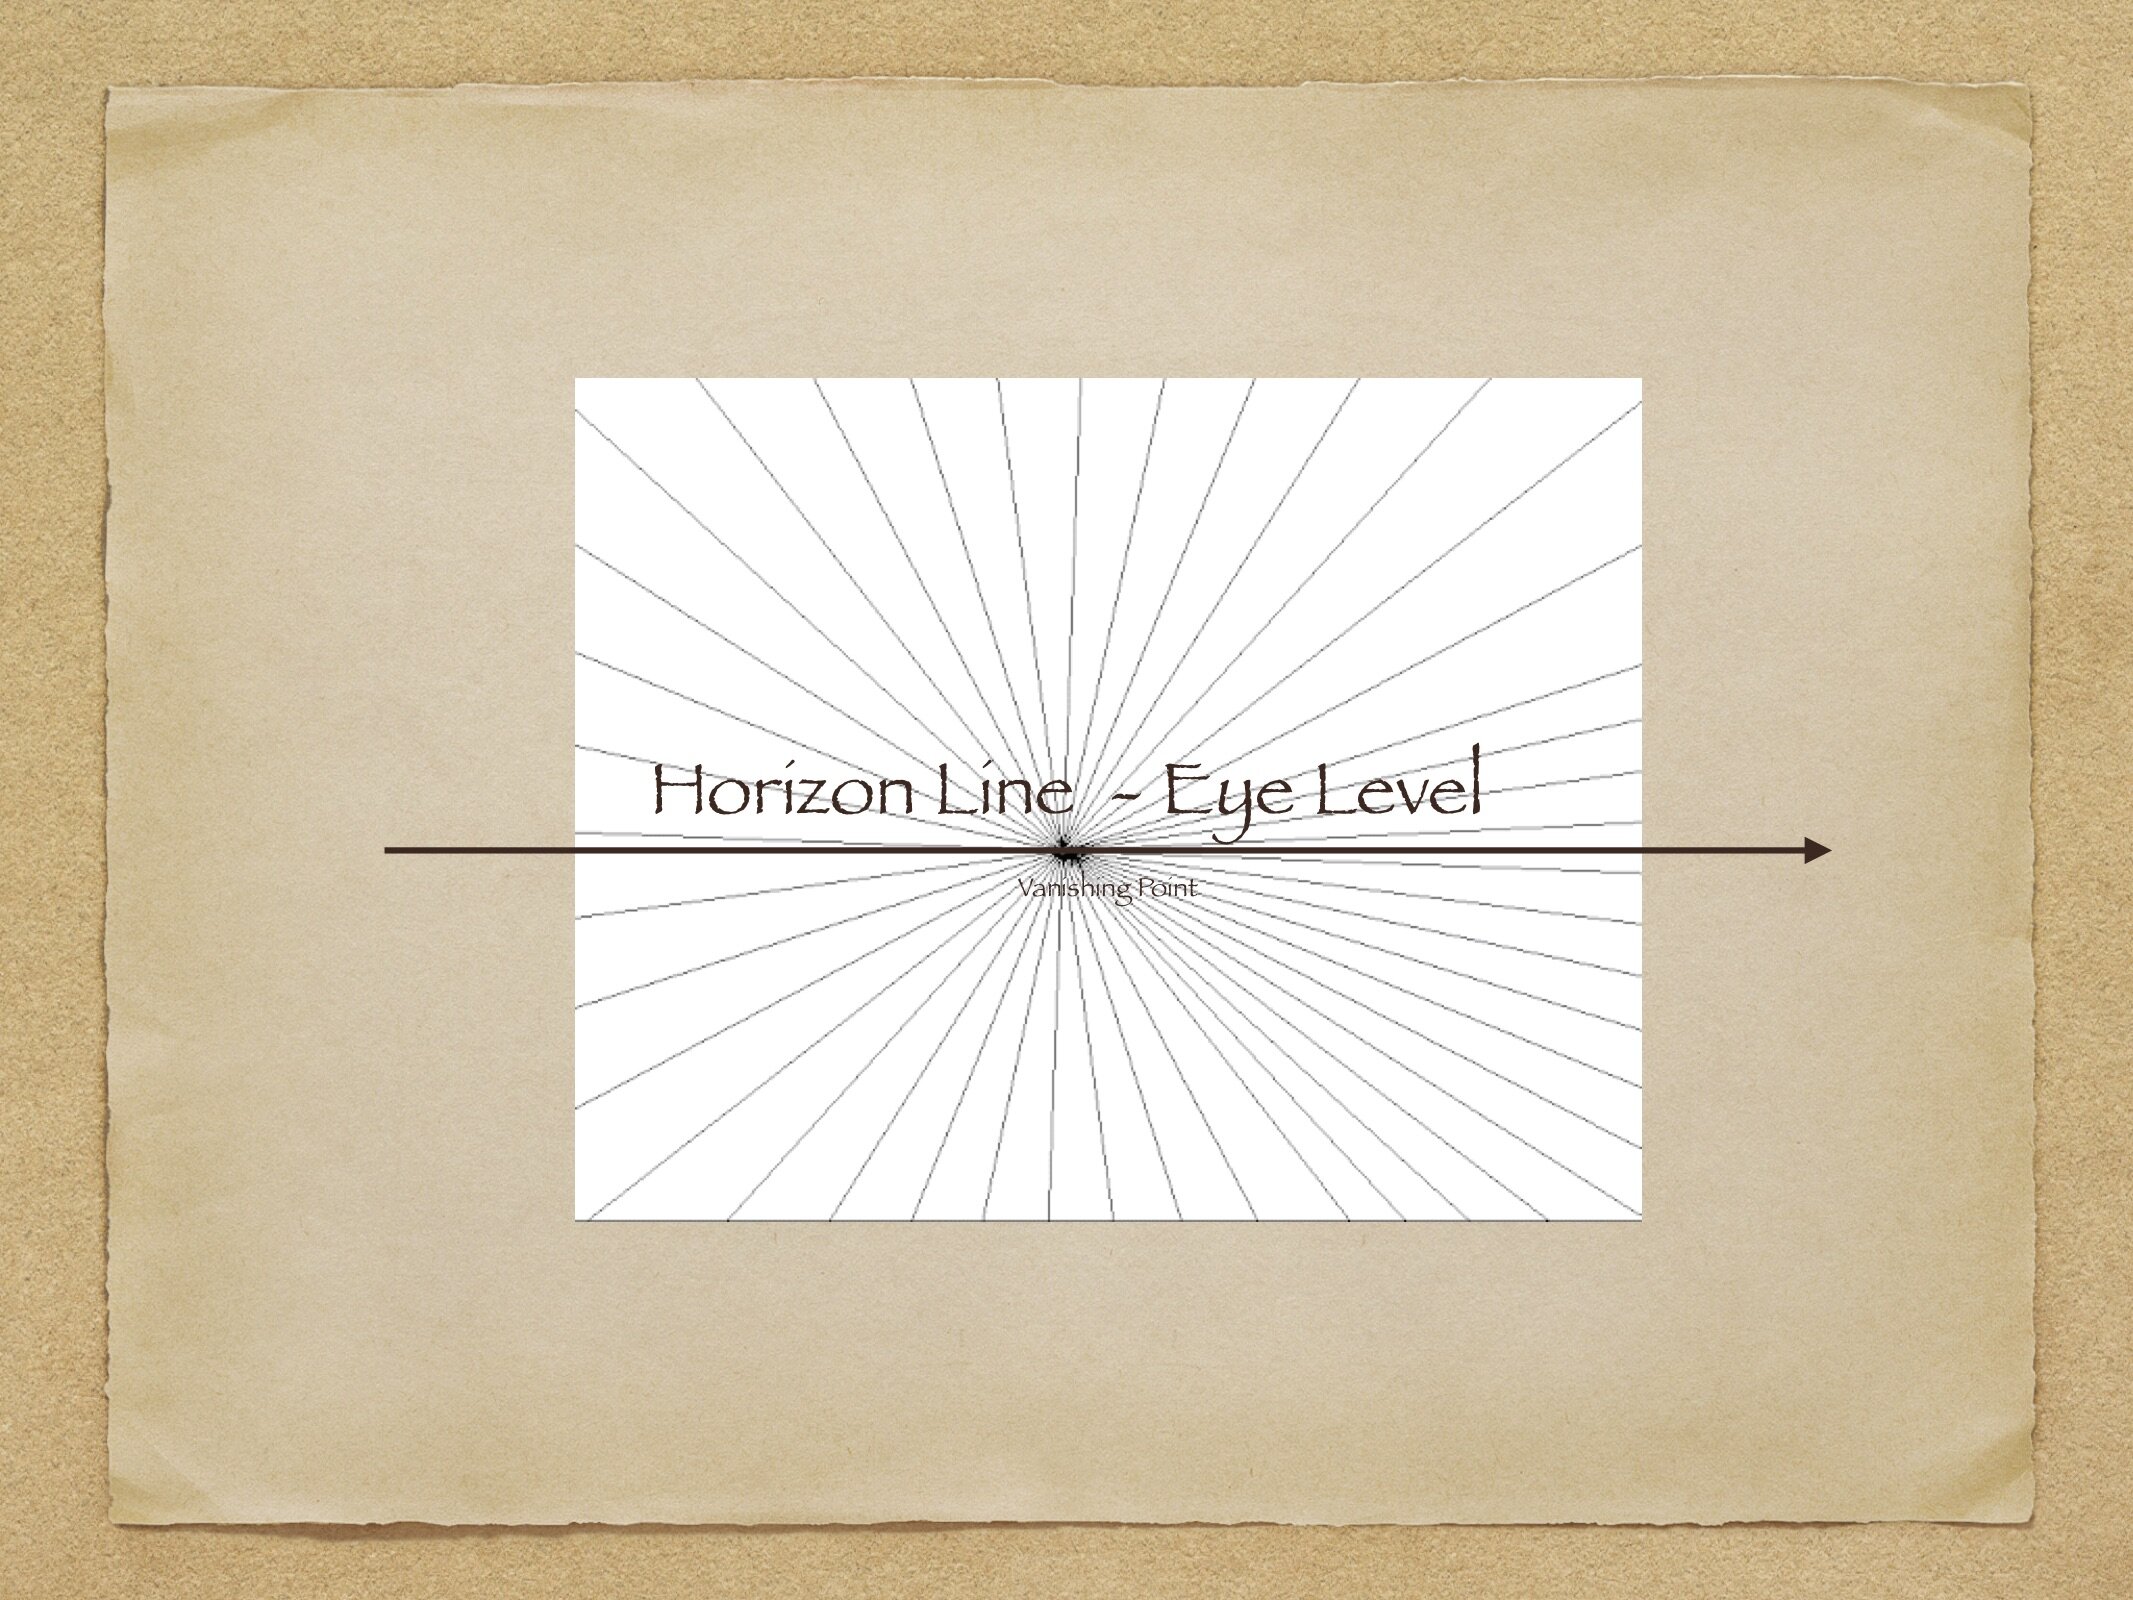
The vanishing point in perspective is where your eyes can no longer see a line vanishing into it. Your eye level to this vanishing point is also called the Horizon Line. Look in the distance when you’re in an open space, a park or the beach, and you’ll see the horizon line in the distance. That horizon line is also your horizontal eye level.

Horizontal eye level? So does that mean there’s a vertical eye level?
Your vertical eye levels can be seen if you close one of your eyes, and find a vertical line to focus on. This vertical line changes when you switch eyes.
The horizontal eye level is the one that is commonly used to express depth or the illusion of depth, because we have gravity and we move around from the level where our feet are. The right side up. The Eye level changes when we’re on higher or lower plane than the ground.


This 3D changes is what is called one point perspective. There’s an imaginary converging of lines to the vanishing point. And if we see areas below and above our eye level affected by converging lines, all objects in this converging lines diminishing into the distance, that’s what we want!

There two point perspective is when there are two vanishing points and they’re placed opposite of each other with the converging lines expanding from the two points and intersecting with each other. The intersections are points where surface planes changes directions and shape.


What if I cant see the vanishing point, Susan? One might ask this question. It is true, sometimes we can’t see the vanishing points, so the technique to use in this case is the clock dial I’ve mentioned above.
If you’re new to perspective and vanishing points. It’s best to draw a variety of compositions that involves the horizon line. Use thumbnail drawings, and make many different variations of compositions using basic shapes first, like the ball, the box, and the cone. And when adding horizon lines, you can change the size of these basic shapes in that thumbnails. You can crop it off the edge, you can tilt it, and you can place more than one.
Once you understand this a bit better, you can change those basic shapes where the triangle becomes a mountain, the ball becomes a tree, and the box becomes a house. And repeat the thumbnail exercise with a horizon line.
What you’ll find after a few of this, is you’ll begin to see the three dimensional areas. And you’ll slowly transfer this seeing knowledge to your drawings when you’re on any location.
FORESHORTENING
The next thing is a confounding one. The theory of foreshortening. This is when you have to draw what’s diminishing into the distance from your point of view. The best way to fully experience foreshortening is to draw your own legs or arm. Use the viewfinder to trace the outer contour of your legs or arm. And transfer that into the paper. And then you can fill in the details by looking at your actual legs and arm.

From Betty Edward’s example
The outer contour is the part that is foreshortened. It will look and feel very odd, and almost unrealistic, but trust the viewfinder, it is your 2D eyes. Your left brain will argue this is wrong, but what is drawn on the viewfinder is the illusion of depth that our binocular vision cannot see. Over time and with practice, binocular vision can be trained to see 2D or a flattened version of what you see.
You will encounter foreshortening in figure drawing a lot. When you look at someone sitting across from you in the subway. Their thigh are foreshortened to you.
The way I use my artist squint to see foreshortening is to find the relationship between the lines already drawn, and the lines you’re about to make. This will be elaborated further in week 9, when we draw still life using the viewfinder.
In the meantime, enjoy grappling with all this concept. They are basic concepts that everyone drawing who wants to improve will need to wrap around their head, but not so fast. Enjoy the process of learning.
In this week’s handout, you’ll get two reference images of an urban landscape that you can use to practice your perspective drawing on. They’re not as good as going out on location and seeing everything in real life, so if you can do that, I highly recommend it instead of using the photograph.
A photograph is already a flattened version of what you see with your binocular eyes, so the learning of depth is reduced a lot. You learn to draw depth fastest by drawing it on location. The difference is truly vast.
Due to the pandemic, some would argue that drawing on location is difficult, yes it can be. But it’s not impossible to go and sit somewhere quiet and beautiful and try to draw what you see.
And now, once this lesson sink in a little bit more, you will see the things in your world in sequence, pattern and repetition.
Cheers until next time,
Susan